Author Archives: Steven McKenzie

Review – Netgear Powerline AV 200 Adapter Kit

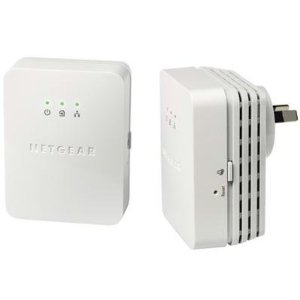
The new Netgear Powerline XAV2001 Adapter Kit

Happy New Year, and happy 2011! I hope the holidays were good for all, and hopefully you’ve started relieving yourself of the stress and commotion of the busy holiday season. Recently, I joined an endeavor called Project52. You can read more about it here: Project52, Basically, it boils down to an “accountability group”, with one goal in mind: making a simple post to your blog, once per week, for the next year (52 weeks). It’s a way to keep members in check, and a way to help bloggers along when they get into a rut, or a habit of not posting to their blogs. Obviously, in the case of mine, I haven’t posted for almost two months. I essentially got everything set up, and then left it, as is. Now with the start of the new year, it became time to try to maintain the goal of posting here at a minimum of once per week, for the next year. And to start it all of, I begin with the first product review of the Kenzietech blog.

For this post, I am reviewing the Netgear Powerline AV 200 Adapter Kit. You can pick it up for a relatively decent price at Amazon. Currently, the going price for the product, sold and shipped through Amazon, is $119.99. Since I’ve never done a product review before, I’m not sure how well this will go. But I’ll give it a shot, and hopefully it will be beneficial to those of you who read it.

I’ve never had any experience before with a powerline ethernet adapter, until my father purchased an older 85Mbps model. He used it to provide network capability to his Ooma Telo (something I plan on buying in the near future), and it worked quite well for him. So, I figured that with the layout of network accessibility at our house, that it may be a worthwhile piece of equipment to get for the house. Even better, I got it as a gift for Christmas!

Hardware
To start with, let’s discuss the physical hardware makeup of the adapter kit. The Netgear powerline adapter appears to be very solidly made. At a form factor of roughly 3″x2″x1″, the ability to convert and revert network signals into and from a 110V power source is quite impressive. Each adapter weighs in at about 1/2 a pound or so at most. On one end, a female CAT5 jack is housed. On the side is a “quick-lock” type of button, allowing a quick ability of encrypting / unencrypting signal between all assigned adapters. And on the front are three lights: one for power, one for network signal, and one to show connectivity with another adapter. All of this is wrapped up in a solid-feeling outer plastic shell.

Setup
Netgear hits it right on the head when it comes to setup involved in making it work. I won’t go too in detail in this section, since most of it is covered in the next section (software). But without any configuration required, it just works. Plug a CAT5 cable from your network (router, switch, etc) into the CAT5 jack on one of the adapters, and plug a CAT5 cable from your computer into the CAT5 jack of the other adapter, plug them in, ensure that the activity light is green on the adapters, and you’re good to go. Simple as that.

Software
Originally, when my father purchased the 85Mbps version, the software that came included was a bit lacking. There appeared to be some bugs when getting the encryption set up, some grammatical errors in the instructions / configuration, etc. It wasn’t perfect, but it worked. Now, when I got the 200Mbps version and popped the CD into my PC to install the software, it immediately asked me if I wanted it to check for a newer version of the software before installing. I said OK, and let it check for a new version. Lo’ and behold, a new version was available. And even better – it was version 2.0. Woot! So I let it download and install (it was pretty small), and started it up.

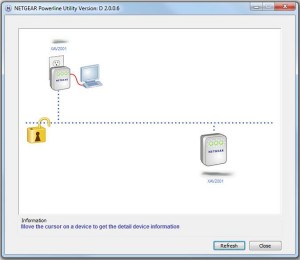
Initial Interface Upon Load

The initial interface was quite different, and much simpler than the original software. As you can see, it is stripped down to the bare bones. You’re simply provided with a graphical display of the available detected powerline adapters, their models, which one you are connected with, and the speed that you are communicated with that adpater, when you hover over the adapter. This provides a nice visual display, and allows you to verify communication is set up properly. In addition, you also see an unlocked icon displayed between the two adapters. This means that data transferring between the two adapters is unencrypted.

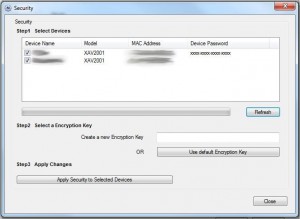
Configuration Screen

To enable encryption between the two devices, you simply need to bring up the configuration screen. From there, you can specify an encryption key to be shared across both devices. This will allow the data to be encrypted, preventing unauthorized access to your network, and to your data. During the configuration process, however, you will need to enter the device password for each adapter. This is a hardcoded password printed next the serial number on the router. This will prevent an unauthorized user from enabling encryption over all the devices, and ensures physical access to the device is necessary. Once this is configured, you can simply enable and disable encryption over the devices, simply though a physical button located on the device. In order to enable encryption, you simply have to press the lock button on the side of one of the devices, then press the lock on the other devices you need encrypted within the span of two minutes (I believe).

Speed
With my testing I’ve done with the kit, I’ve achieved impressive speeds between the two devices, especially considering average speeds that powerline adapters were getting just a few years ago. The XAV2001 has a maximum theoretical speed of 200Mbps. Currently I have one adapter sitting in the basement on the far side of the house. The other, hooked to my desktop, is upstairs (two floors up), on the other side of the house, roughly 30 feet away (straight up and across). According to the interface, I am receiving from the one in the basement at about 110Mbps, and transmitting at around 145Mbps, for an average of roughly 117Mbps. It’s not as good as gigabit speeds that I plan to get when I finish running CAT5 upstairs. But at speeds slightly better than theoretical max 10/100Mbps speeds of 100BASE-TX connectivity, I’ll take it. When comparing what I was getting to wireless speeds from a wireless router positioned in roughly the same spot in the basement, I was only getting speeds of around 18-20Mbps. So it’s definitely a much better improvement!

Durability
Since I’ve only had the kit for a few weeks, I can’t comment too much yet on the durability of the device. It’s seemed to work flawlessly for me, and I haven’t had any signal dropouts with it yet. I’ve used it when the TV has been on, refrigerator running, dishwasher, washer and dryer, etc. Nothing has interfered with the signal yet. It seems to be holding up like a champ.

One negative with the durability though resides from the set of adapters that my father had. One of his quit working after a few months of usage. It appeared that the physical CAT5 connector on the adapter quit working, and we could no longer plug anything into it. It still appeared to communicate just fine with the other adapter, but simply failed to be accessed by a CAT5 cable any longer. It’s important to note, however, that he actually purchased it used (or refurbished, I don’t remember which) off of eBay. So that may have adversely affected the expected lifespan out of the device.

Summary
Overall, the Netgear Powerline AV 200 Adapter Kit has been a great buy (gift), and I will definitely be purchasing more of the adapters to add to the network. I’ve got a few Xbox 360s (old kind) that don’t have wireless connectivity. I’d rather spend $60 on another adapter for it that I can use for anything else I would prefer (including a switch, to grant network access to more than one device), than spending $75 or so on a simple wireless adapter for the Xbox. It’s worked like a champ so far!

Netgear Powerline AV 200 Adapter Kit
Hardwarewww.dyerware.comwww.dyerware.comwww.dyerware.comwww.dyerware.comwww.dyerware.com
Solid, durable feeling. Nice and compact.
Setupwww.dyerware.comwww.dyerware.comwww.dyerware.comwww.dyerware.comwww.dyerware.com
Setup was a breeze. Simple plug and play connectivity.
Softwarewww.dyerware.comwww.dyerware.comwww.dyerware.comwww.dyerware.comwww.dyerware.com
Simple, intuitive software. Easy to navigate.
Speedwww.dyerware.comwww.dyerware.comwww.dyerware.comwww.dyerware.comwww.dyerware.com
Fast speeds. Not theoretical maximum. Slight volatility from interference.
Durabilitywww.dyerware.comwww.dyerware.comwww.dyerware.comwww.dyerware.comwww.dyerware.com
Works well for me. Slight concern over failure of CAT5 jack.
Overallwww.dyerware.comwww.dyerware.comwww.dyerware.comwww.dyerware.comwww.dyerware.com
Great product overall! Will definitely expand my network with.

– Admin

Google Calendar – Problems sharing outside of domain

So I discovered something new today.  I’ve known for quite some time that Google had their Google Apps capability available for businesses, for a cost of $50.00 per year, per user.  So when I started thinking a bit more about actually putting forth some effort into this domain, I started thinking about paying that, in order to have the suite of Google Apps at my disposal.  But, I wasn’t looking forward to paying the $50.00 a year.

Fast forward that thought until today.  I was doing a bit of looking online, and I came across the following link: http://www.google.com/apps/intl/en/group/index.html.  Lo’ and behold, I was not aware that they supported a standard (free) edition of their apps to domain holders!  So I immediately signed up.  After signing up and verifying my domain (super easy), I set off on my first task – setting up a calendar, that I could share with my main @gmail.com email account.

I suppose this is a good point where I should back up and explain why I was trying to do this.  At the place where I work, we use an Exchange server, and access it through the standard Microsoft Outlook mail client.  However, I don’t have access to my work email account at home.  So, I have my work account set to forward all meeting invites to my @gmail.com email account.  Unfortunately, this is a bit annoying, because it automatically adds those events to my mail calendar, not one of my secondary calendars.  I wanted to add it to a secondary calendar, so that I could keep it separate from my life calendar.  So, I had created a new calendar, checked the settings, found the private calendar email address, and promptly emailed a meeting invite to it.  And I waited…….. and the meeting invite never showed up in my calendar.  I verified that it was set to automatically add invitations.  But they never showed….  So I logged into another email account that I had from a different domain that was using Google apps. I forwarded a meeting invite from that account to the private calendar, and it showed up immediately.  Back and forth I fought and debugged the problem, and was never able to solve the issue as to why a non-Gmail / Google App domain meeting invite couldn’t send a meeting to a secondary calendar, even though it could successfully to the primary calendar.  I finally gave up that endeavor.

So jumping back to today.  I figured that I could create a personal email account for my domain using Google Apps, set up a primary calendar for that specific email account, and then share that calendar with my @gmail.com email account.  Voila!  All events would show on my primary account, and still give me the ability to keep them separate from my main account calendar.  So, I went to my new email account, went to the calendar settings, went to the calendar share tab, and set to work.  I added the email address of my primary account, gave it permissions to make changes to the event, and clicked “add”.  Horray!  Wait…crap, it didn’t work!  I looked down and noticed that it only showed that the shared email address only had the ability to see only free / busy time on the calendar.  But that wasn’t what I selected!  I was confused….

Being a bit of a new user with the Google Apps domain administration interface, I wasn’t sure where to go, or even what needed to be done to fix this.  I mean, why weren’t the settings being maintained for this shared account I was trying to share the calendar with?  For a moment, I had a fear that it was because I was only using the standard edition, and not the premier account.  But fear not, a quick bit of Googling led me to the following link: http://www.jonathanmacdonald.com/?p=2512.  In case the link is no longer available in the future when this post is read, I’ll post the instructions here as well for you to follow.

Essentially, the root cause of the inability to set the sharing settings to anything other than only showing free / busy availability is the following setting:

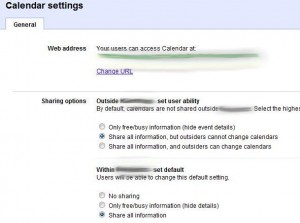
In order to solve the issue, you must update your domain settings themselves, rather than the calendar settings which actually seem to be the issue.  By default, Google locks down your domain’s calendar sharing settings outside of the domain.  This is a security mechanism (feature?) to help protect calendar data.  In order to fix the problem, must log into your domain Google Apps settings as the administrative user.  Here, you can open up security on the calendars, allowing them to be shared outside of the domain, up to any security level you wish, out of those three options.  Here you can see the three different options to choose from:

In this situation, I have decided to choose the option that allows me to share calendar details outside of the domain, but not let those users make any changes to the calendar.  You can adjust this to allow them to make changes as well, if your situation requires that capability.

Finally, after making that change, you can now go back to your domain user’s calendar, bring up the user’s calendar settings, and you should be able to update their sharing settings up to whatever level you chose for the domain settings:

One important point to note, is that making the sharing options change sharing globally across the entire domain.  You cannot specify that only certain users, or certain calendars, can have their details shared outside of the domain.  So be careful when making these changes, as they will affect every calendar configured from within the domain.

One small issue I had after making this change, was that it was not immediately available in the domain user’s calendar.  I tried a combination of logging out the domain user, deleting the calendar, re-creating the calendar, disabling sharing on the calendar, re-enabling, etc.  Nothing seemed to work, as it still only gave me the option to see free / busy details of the calendar.  However, I left the computer for about 3 hours and came back, and it appeared to work by that time.  So, it may just take some time for the changes to propagate across the entire environment.  If it doesn’t work for you, first verify that the correct changes were made, and then try again later.

I can’t believe how long-winded this post ended up being.  Hopefully it wasn’t too boring, and hopefully it was helpful for those of you who have run into the same issue that I had.  Enjoy!

– admin

The Start of the Life of the Blog of Kenzietech.com

“By George, I’ve done it!”

Ok, ok.  I know, the phrase is actually “By George, she’s got it!”, debuted in My Fair Lady in 1964.  But I figured it was a fair opening for the first blog post I’ve ever made in my entire life.  Well, “official blog post, that is”.

Alright, let me back up for a second and start off by explaining who I am, and what the purpose of this blog is, so that it doesn’t appear to be randomly sticking out in the middle of the interwebs.  To begin with, I am the admin, owner, and creator of Kenzietech.com.  As it stands at the moment, the site is filled with nothing more but a simple WordPress blog.  A blog, and a basic front page, that contains absolutely nothing.  Zilch.  Nada.  Empty.  But that’s about to change.  Why?  Because I am a fairly recent graduate with a degree in Computer Science, with further pursuit of a Master’s in Computer Science.  I am currently working full-time as a software developer, and have devoted my life to technology, both in and around computers.  After spending such a large portion of my life with technology, and yet failing to maintain an active, public domain, I figured it was best to get that going and get my website off the ground.

Unfortunately, I didn’t have any idea as to what to design the website around.  There are countless websites available, ranging from anything from reviews, to previews, from design methodologies to enhancements, tips and tricks, and everything in between.  There’s no real ‘niche’ still available to tap into with a website.  So I figured, why not make a catch-all website, with which to stick everything that I can think of, technology-wise into.  Let’s just call it the technology “kitchen sink”.  Anything, and everything can go here.

The goal of the website, and associated blog is simple: build a place where anyone can go and look up whatever they would like with technology.  If it’s there and informative – good.  If it’s not, it should be.

Stay tuned to the future changes, updates, and development of the KenzieTech Blog, and KenzieTech.com.  With a little bit of time, effort, and a lot of joy and enthusiasm, hopefully I can make the site a great place to visit for all things technology.

Thanks for looking, and stay tuned!

– admin